Topics
Layers
Layers are a very important component in doing almost anything in GIMP or an other image editing program. When you are first learning about layers, the easiest way to think of them is to see each layer as a transparent glass panel. In other words every layer acts an independent transparent glass panel. The layers stack up over each other just like a stack of transparent glass panels. What that means is that if there are transparent areas in the layer you see all the way through the layers from top to bottom just like looking down a stack of glass panels.
Topics covered:
- The GIMP .XCF File Format
- Layer Transparency
- The Base Layer
- The Layers Panel
- Layer Modes
- Layer Adjustments
- Adjusting Brightness or Contrast with Layer Modes
Introduction to Layers
One of the problems when working with image editing programs is that everything is pixel based and when you make changes or enhancements to an image that change tends to be permanent. For example if you made an enhancement to an image in GIMP yesterday and then opened it up today and realized you shouldn't have made that change, there's not much you can do about it as the change is permanent.
One way to make changes to an image but not make the change permanent is to make a copy of that image on its own layer. The actual image file will then contain two copies of that image, each on its own layer. In that way you can make all kinds of change to one of the image layers without effecting the other. So if you decided later you didn't like those changes you made you would just delete that layer and make another copy of the original image layer and make changes on that new copied layer. Generally, making an enhancement or change directly to one layer does not effect the other layers until you start using special effects options such as Layer Modes.
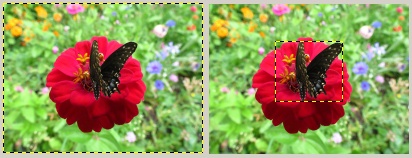
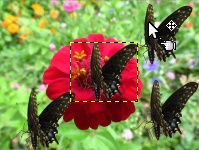
Layers are very important if want to create an image montage (an image montage is a bunch of different image from different files that are combined into one image) or make up an image composition. When creating an image montage you could copy and paste images from different files into your file but keep them on separate layers. In this each image layer can be scaled, moved, enhanced, re coloured, etc., without effecting the images on the other layers. A simple image montage is shown below:
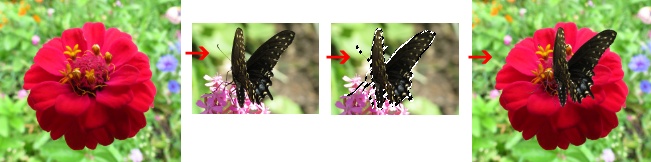
1) The red flower image looks a little boring. It needs something to make it more interesting.
2) A butterfly image is found.
3) The Selection tools are used to isolate the butterfly image pixels.
4) The selection is copied (EDIT -> COPY or CTRL+C)
5) The selection is pasted as a Layer into the red flower image (EDIT-> PASTE AS-> NEW LAYER).
6) The butterfly layer is moved around to position the butterfly more to the centre of the flower.
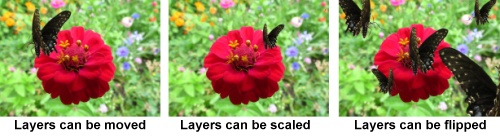 Because the butterfly layer is independent, it can be repositioned (moved), resized, reversed (flipped) and duplicated without affecting the flower layer. Instead of having an image montage made up of just one butterfly image, there is now a montage made up of a field of butterflies.
The GIMP .XCF File Format
Every layer added to an image file increases the file's byte size. So an image file that has lots of layers can be many Megabytes bigger that its original file size. Once a file contain layers it can not be saved back into its original file format. That means if you opened a .jpg file and added layers to the file, it can not directly be saved as a .jpg file format. Any image files with layers are always saved with the GIMP .xcf format (In GIMP 2.8 all image files are automatically saved in the .xcf format). This is the only format that a file can be saved in once layers have been added. The advantage of the .xcf format is that it preserves all the layers and effects added to layers so that the file can be reworked and refined over and over. Most image formats such as the .jpg format do not support layer technology.
Exporting to a Different Format
Once the layered file is completed and you wish to have a .jpg version of the file you simply Export a copy of the file to the .jpg format (FILE-> EXPORT-> and choose .jpg from the file list). A .jpg copy of the file is saved into the folder you choose but the .xcf file stays open.
Layer Transparency
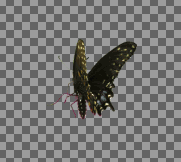 When the Butterfly image was pasted as a New Layer, the only part of that layer that was solid was the area the contained the actual pixels that made up the butterfly. The rest of the layer was made transparent (alpha channel).
Sticking to the analogy of the glass panels, it is similar to cutting out a picture of the butterfly image and pasting it onto a glass panel and placing that glass panel on top of the red flower panel. Even though the butterfly glass panel is on top the flower, the flower is still visible because the rest of the butterfly panel is transparent because it is made of glass.
Traditionally, image editing programs use a checkerboard pattern to indicate layer transparency, as shown here with the butterfly layer. About the only time you ever see the checkerboard pattern in a layer is if you make all the full pixel layers temporarily invisible (turn them off), as is the case here, where the flower layer is turned off revealing the checkerboard transparency pattern of the butterfly layer. Otherwise you never see the checkerboard pattern.
The Base Layer
When you open an image in GIMP it is automatically placed on a layer called the Base Layer. The Base Layer is treated a little differently that the other layers. For one thing, GIMP assumes that you want the Base Layer to always be the bottom layer. As a result, the Base Layer doesn't have its transparency property (alpha channel) turned on. For the most part that's probably fine because if this is your main image you will probably be pasting the other images on top.
Alpha Channel
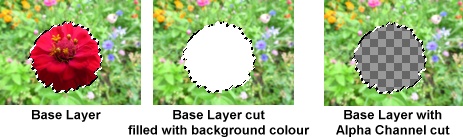 However there may be times that you may wish to cut away some of the pixels in the Base layer to make part of it transparent like other layers. However what will actually happen if you cut pixels out of the Base Layer is that instead of getting a transparent area as would happen in a pasted layer, the cut out area will be filled with the background colour from the toolbox as shown here.
This is because the Base layer is assumed to be the bottom layer and its also assumed that you don't want to have any transparent information associated with it. When you do want the Base Layer to support transparency then you need to apply it. To turn on the transparency for the Base Layer you add an Alpha Channel (LAYER-> TRANSPARENCY-> ADD ALPHA CHANNEL). Therefore an Alpha Channel holds the transparency information for a layer and is visually represented as the checkerboard background.
When you paste an image as a New Layer, as in the case of the butterfly layer, the Alpha Channel is automatically incorporated into that layer. The only thing you really need to remember about the Alpha Channel is that if you are cutting pixels out of a layer and instead of getting a transparent area, you end up getting the background colour, then, for whatever reason, that layer doesn't have an Alpha Channel embedded in it and you need to add the Alpha Channel as mentioned above.
The Layer Boundary Box
 An image file can contain many layers but you can only work on one layer at a time. GIMP indicates which layer you are on by placing a Layer Boundary box around the image layer. However the box only covers the pixel area of the layer as shown here.
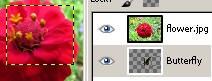
In the first image the flower layer is selected indicated by the Layer Boundary box that surrounds the whole image. When the butterfly layer is selected the box only extends around the butterfly image itself because that is the only area on that layer that contains any pixels. Layers are selected through the Layers Panel described below.
The Layers Panel
 The Layers Panel (Dialogue box) contains layer options that can be applied to layers, such as layer visibility, locking layers, deleting/adding layers, changing the stacking order, applying merge mode effects, controling layer opacity and merging layers. Every layer created is shown on the layer list, in this example only two layers are present; the flower layer and the Clipboard layer (butterfly layer). A layer that is selected appears highlighted in blue. To simply things only the most common layer options are identified.
- Layer Menu: opens a menu with additional layer options
- Layer Modes: determines how colours from the active layer and the layers below it will interact. The default is Normal meaning there is no colour interaction between layers.
- Layer Opacity: layers can be made semi-transparent, Transparency levels are between 0-100.
- Layer Visibility: the "eyeball" icon means the layer is visible. Clicking the "eyeball" hides the icon indicating the the layer is not visible.
- The layer menu command buttons at the bottom.
Some examples of the various layer options applied to the butterfly layer:

Naming Layers
![]() Every layer has a name. Often default names are used as is the case with the layer named "clipboard" shown above. The Clipboard layer is the butterfly layer and because that image came from the Window's Clipboard via the Paste menu, it's default name is "clipboard". However a layer's name can be changed at anytime. To change a layer's name:
Every layer has a name. Often default names are used as is the case with the layer named "clipboard" shown above. The Clipboard layer is the butterfly layer and because that image came from the Window's Clipboard via the Paste menu, it's default name is "clipboard". However a layer's name can be changed at anytime. To change a layer's name:
- Double click on the layer's name
- The layer's name will be highlighted
- Type over the name and hit the ENTER key to finish the entry
Layer Stacking Order
 There is a stacking order to layers. The Base Layer is at the bottom of the stack and every new layer added stacks on top of the previous layer. The stacking order of layers can be changed any time by moving layers up or down through the Arrow buttons on the Layers Palette or by dragging the layers manually. In this image the butterfly layer was moved below the flower layer and is not visible because it is hidden beneath the flower layer.
Duplicating layers
![]() Layers can be duplicated either through the Duplicate Layer button located at the bottom of the Layers Panel or through the Layer Menu (LAYER-> DUPLICATE LAYER). In either case the layer to be duplicated needs to be selected first.
Layers can be duplicated either through the Duplicate Layer button located at the bottom of the Layers Panel or through the Layer Menu (LAYER-> DUPLICATE LAYER). In either case the layer to be duplicated needs to be selected first.
Flattening layers
If your image composition or montage is complete and you don't need all the layers anymore all the layers can be merged (collapsed) into just the Base layer. This process is called "Flatten Image" and its available under the Layers Menu arrow in the Layers Panel. You can also just merge a single layer downward into another, one a time, if you don't need all the layers to be merged.
Deleting a Layer
![]() A layer that is no longer needed can be deleted by selecting it and then clicking on the Delete Layer button, represented as a grabage can, on the bottom of the Layers Panel. A layer can also be dragged to the Delete Layer button to delete it.
A layer that is no longer needed can be deleted by selecting it and then clicking on the Delete Layer button, represented as a grabage can, on the bottom of the Layers Panel. A layer can also be dragged to the Delete Layer button to delete it.
Layer Modes
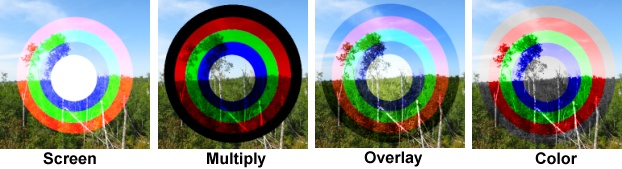
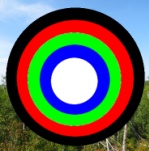 Layer Modes dictate how colours interact between layers. This is a tool that does requires some practise to understand the process. The image shown here is the original image that contains 2 layers; a landscape layer below and a layer containing rings of colours. For these examples the "mode layer" is the layer that has the Mode effect applied to it (ring of colours) and the underneath layer is the layer underneath it (landscape layer). Some of the most common Layer Modes effects are listed below. Particularly note how black and white in the mode layer is treated. Compare the original to the mode samples shown below.:
- Screen: has a similar effect of using multiple projectors to project the same image on the same spot, resulting in a very light, washed out image. The mode colour is strongest over black, white and gray values but colour over colour gets mixed together, i.e. where the red ring overlays the green colour of the forest that part of the ring turns into orange (red + green = orange), whereas the red ring over blue sky creates the secondary colour magenta (red + blue = magenta). Note that the black ring disappears and the white ring stay solid as white is not affected..
- Multiple: is the reverse of Screen, multiples the colours making all colours darker. More akin to placing a dark colour transparency directly over a black & white photograph. There is no mixing of colours as the mode colours influences all colours. In the mode layer, black is unaffected and white becomes transparent.
- Overlay: mode layer is always lighter and has the effect of being "painted" over the black, white and gray values of the layer beneath. However colour over colour gets mixed together, i.e. where the red ring overlays the green colour of the forest that part of the ring turns into orange (red + green = orange). Where there was more green in the foliage there is more orange, where there is less green there is less orange. While the red ring overlays the blue sky it creates the secondary colour magenta (red + blue = magenta). However black's influence is different. Notice that the black ring deepens the colours, particularly in the sky. The Overlay mode is often used to deepen the colours of a blue sky.
- Color: the brightness of the mode layer colour overlays the dark and light values of the layer beneath. There is no mixing of colours, the mode colour is the dominant colour, except that white, in the layer beneath, is unaffected . As shown both the black and white rings produce gray.
Layer Adjustments
Moving a Layer
![]()
 When a layer is selected it can be moved with the Move Tool found in the Toolbox. However this tool can also move layers that haven't been selected. If you place the Move tool over any layer and keep the mouse button down you can temporarily select and move that layer.
In this image the butterfly layer has been duplicated 3 more times. The butterfly that is in the centre of the flower is selected indicated by its boundary box. However placing the Move tool over any other butterfly layer will allow that layer to be moved without the need to select it first through the Layers Panel.
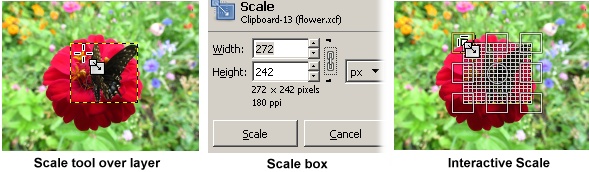
Scaling a Layer
![]() If you wanted to make the butterfly image larger or smaller you technically have to Scale the layer. Scaling a layer only refers to the pixel area of the layer. There are two methods to scaling a layer; the interactive Scale Tool or the Scale Box. Both tools will appear when scaling a layer with the tool. The Scale box contain the spin arrows that allow for exact measurements while the Interactive scaling allows for free scaling. Make sure the "chain" icon is selected in the Scale box to keep the proportions or hold down the CTRL key in the interactive mode to keep the proportions.
If you wanted to make the butterfly image larger or smaller you technically have to Scale the layer. Scaling a layer only refers to the pixel area of the layer. There are two methods to scaling a layer; the interactive Scale Tool or the Scale Box. Both tools will appear when scaling a layer with the tool. The Scale box contain the spin arrows that allow for exact measurements while the Interactive scaling allows for free scaling. Make sure the "chain" icon is selected in the Scale box to keep the proportions or hold down the CTRL key in the interactive mode to keep the proportions.
Adjusting Brightness or Contrast with Layer Modes
For users not familiar with the Levels and Curves commands for adjusting image brightness and contrast, a quick, but limiting way, to adjust brightness or contrast is through Layer Modes. All that is required is that base image layer (original image) is duplicated so that there are two images. The top image has the mode applied to it which in turn effects the image below.
Increasing Contrast
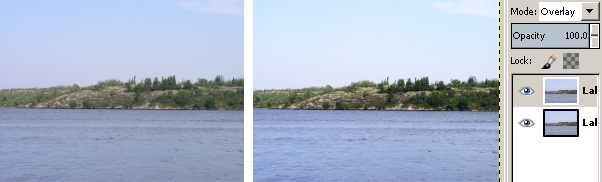
The first image was taken during a fairly cloudy day resulting in a dull image with low contrast. The image is duplicated and the Overlay mode is applied. The doubling of the images deepens the colour and increases the contrast as shown. If there is too much contrast the Opacity of the mode layer (top layer) can be dialled back.
Increasing Brightness
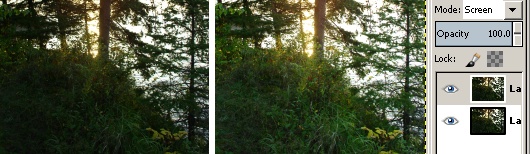
The first image was taken when the sun was setting resulting in a darker picture as everything is falling into shadow. It is duplicated and the Screen mode is applied to the top image. Screen always lightens but still maintains the contrast and therefore the foliage becomes more visible. If the image is too light, the mode layer (top layer) can have its Opacity dialled back.
Depending on the conditions that the original picture was taken, duplicating the image and applying the Overlay and Screen as shown above won't always produce the same results but its worth trying as a quick first step to enhancing an image.
Conclusion
Layers allow you to control image development including creating montages, compositions, enhancing images or just experimenting with effects. Its always a good idea to duplicate the base layer and work on the duplicate in case things don't work out. Remember that the SAVE/SAVE AS commands in GIMP 2.8 will only save to the GIMP .xcf format and that file has to be Exported to other common formats.
Comments or suggestions: lincpark@hotmail.com.